Sharing photos on social media has become an everyday activity for millions of users. Many iPhone owners prefer using Live Photos, a feature that captures a few seconds of motion before and after a picture is taken. These photos feel more dynamic compared to regular still images.
If you want to share such photos on Instagram, there are a few steps you need to follow. Although Instagram mainly supports standard photos and videos, iPhone users can still upload Live Photos after converting them into a compatible format.
Below is a detailed guide explaining what Live Photos are and how you can post them on Instagram.
What Are Live Photos?
Live Photos are a camera feature available on Apple iPhone devices that captures a short moment along with the image. Instead of taking a single frame, the camera records a brief clip including movement and sound.
When you press and hold the image in the Photos app, it plays the short animation, bringing the moment to life.
Apple first introduced this feature with the launch of the iPhone 6s, and it has been available on most iPhone models released afterward.
How Live Photos Work on Instagram
Instagram does not directly support Live Photos in their animated format within normal posts. When a Live Photo is uploaded, it typically appears as a still image.
However, iPhone users can still share these photos by converting them into a regular image before uploading them on Instagram. Once converted, they can be edited and posted like any other picture.
How to Enable Live Photo on Your iPhone
Before posting a Live Photo on Instagram, ensure that the feature is enabled when capturing the image.
Follow these steps:
-
Open the Photos app on your iPhone.
-
Choose the photo you want to use as a Live Photo.
-
Swipe up on the photo to view additional options.
-
Tap the Live option to activate the Live Photo effect.
-
Press and hold the image to preview the motion clip.
Keep in mind that Live Photos are available only on iPhone 6s or newer models, and the option must be enabled in the camera settings while taking the picture.
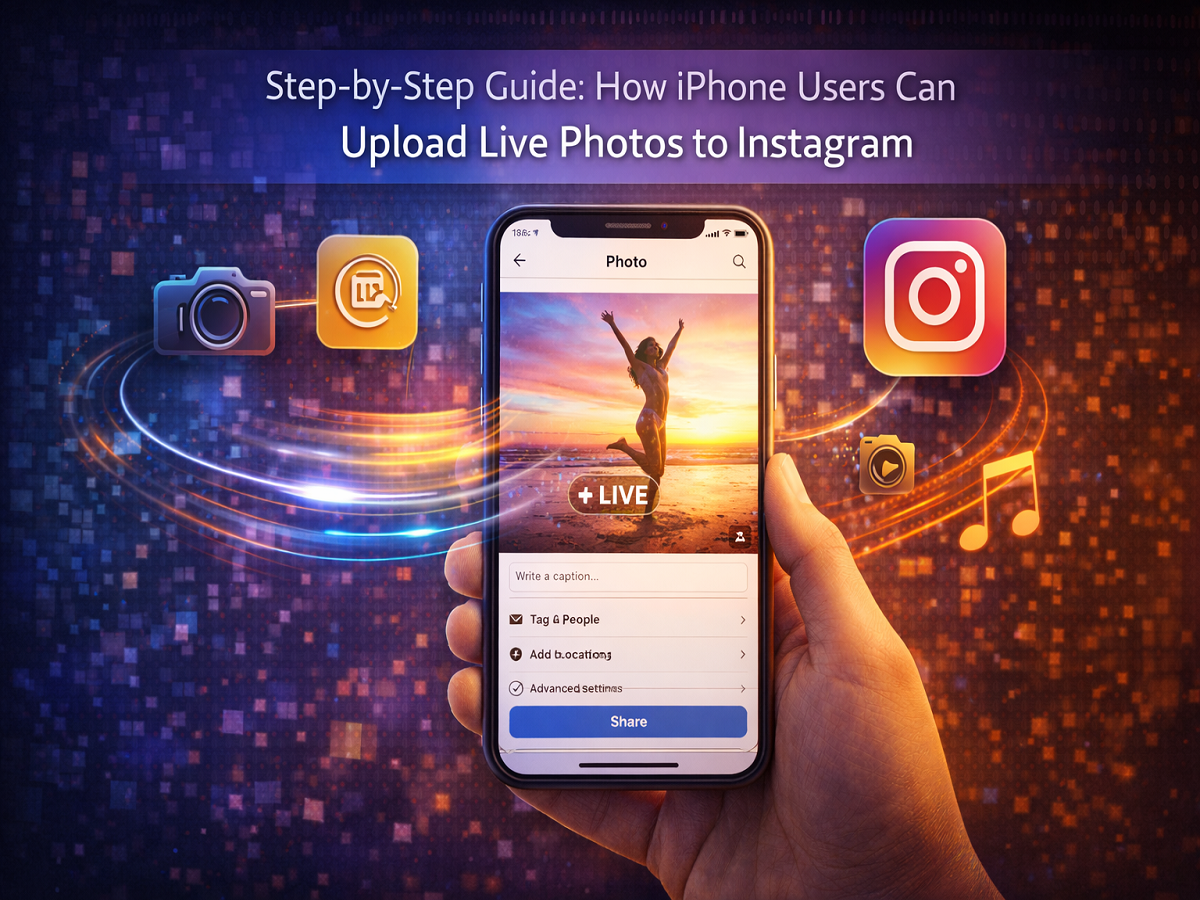
Steps to Post a Live Photo on Instagram
Follow these steps to upload your Live Photo on Instagram.
Step 1: Open Instagram
Launch the Instagram app on your iPhone.
Step 2: Create a New Post
Tap the “+” icon located at the bottom of the screen to start a new post.
Step 3: Select Your Photo
Choose the Live Photo you want to upload from your camera roll.
Step 4: Access Photo Options
After selecting the photo, swipe up on the screen to reveal additional options.
Step 5: Turn Off Live Mode
Toggle the Live option off. This converts the Live Photo into a regular still image that Instagram supports.
Step 6: Edit Your Photo
You can now edit the image using Instagram’s built-in editing tools. These tools allow you to:
-
Apply filters
-
Adjust brightness and contrast
-
Crop or rotate the image
Step 7: Add Caption and Tags
Write a caption, add hashtags, tag friends, or include a location if needed.
Step 8: Share Your Post
Finally, tap Share to publish the photo on Instagram.
Tips for Better Instagram Posts
If you want your photos to stand out on Instagram, consider these simple tips:
Choose a clear frame:
Select the best frame from the Live Photo before posting.
Use editing tools wisely:
Enhance lighting, contrast, and colors to improve visual appeal.
Add engaging captions:
A good caption can increase engagement with your followers.
Use relevant hashtags:
Hashtags can help your post reach a wider audience.
Final Thoughts
Live Photos offer a unique way to capture moments with motion and sound. While Instagram does not fully support the animated format of Live Photos, users can still share them by converting the image into a regular photo.
By following the steps above, iPhone users can easily upload Live Photos to Instagram and share memorable moments with their followers.